What is an Employee Cash Advance Account?
An Employee Cash Advance account is used to track the funds that you pay to an employee to cover travel expenses or early paycheck withdraws.
In QuickBooks Online, you can use the other current asset account to keep track of the initial check that is written to the employee.
You can also record the expenses once the employee submits an expense report detailing how they spent the cash for travel expenses and/or reduce their paychecks for the balance.
Keep reading to learn how to record a non-payroll-related employee cash advance in QuickBooks Online.
To get started, log into your QuickBooks Online file and follow the below steps. In my example below, I am specifically showing how to record a non-payroll employee cash advance.
Create your Employee as a Vendor
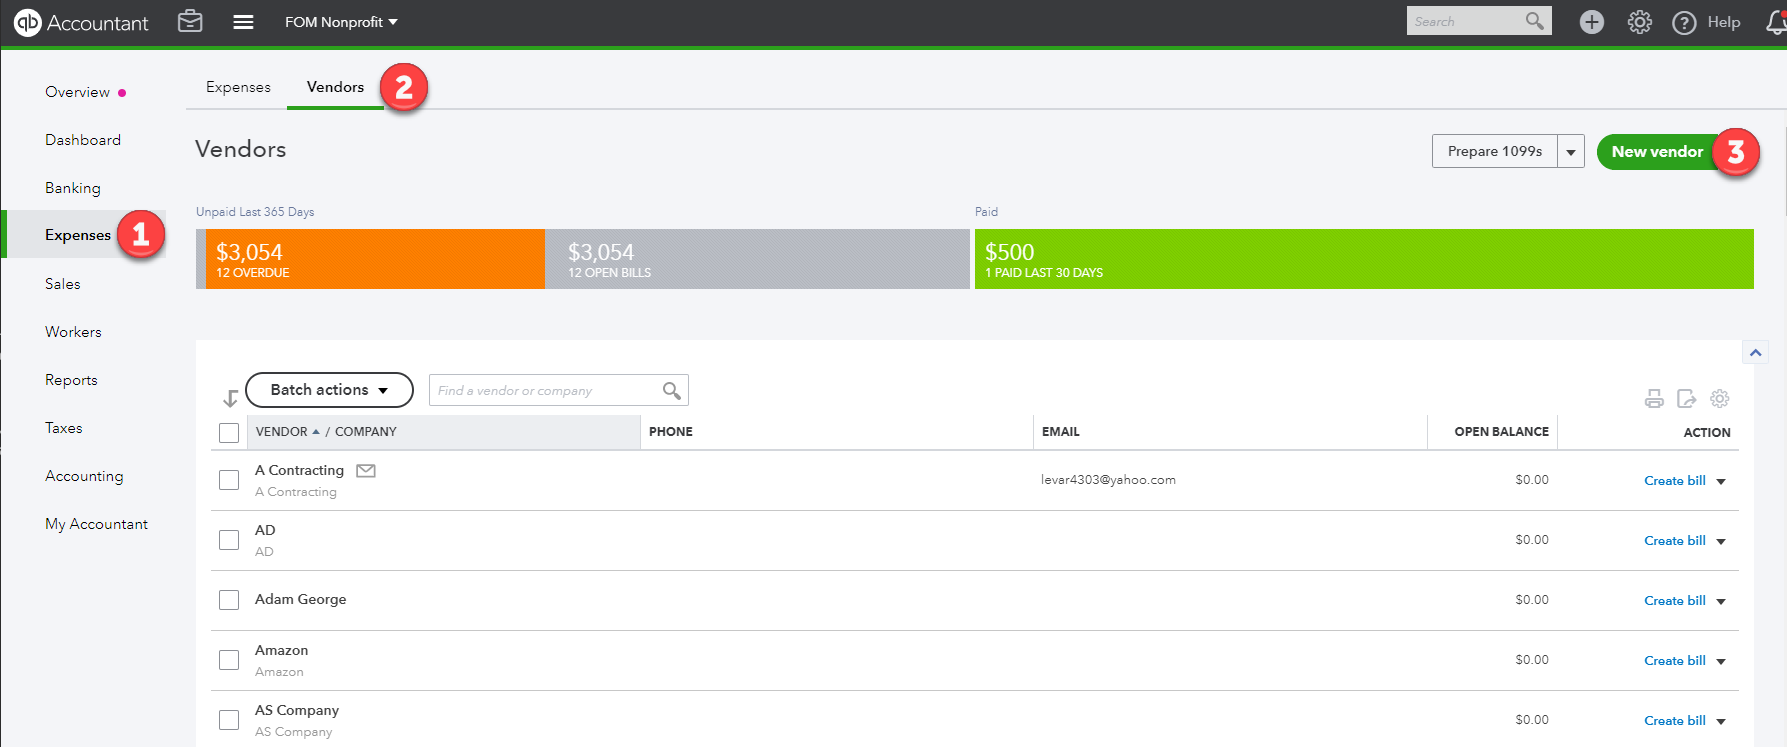
Click the Expenses tab at the left navigation bar, then select Vendors
Click the New vendor green button to create your employee as a vendor if they don't already exist in your vendor center
In the vendor information screen, enter the following:
First and last name of employee and add in the suffix box
Uncheck the box next to print on check as display name, then enter the employee's name without suffix
Complete the address field, email address, and other details
Add a note stating this account is strictly used to record "employee reimbursements and cash advances"
Click save
PRO TIP: Only add the suffix to the employee's name if you are already using the employee center in QBO to process payroll for your business.
Create an Employee Cash Advance Account & A Clearing "Bank Type" Account
Click on the Accounting tab at the left navigation bar, then select the Chart of Accounts
Click the New green button to create a new account
In the account edit window, make the following changes:
Account type = Other Current Assets
Detail type = Employee Cash Advances
Name = Employee Cash Advances
Number = Add an account number
Description = Describe the purpose of the account (optional, but highly recommended)
Leave the balance fields empty
Click the Save and Close green button to create the account
Repeat the same steps above to create a bank type clearing account if you don't already have one listed in your chart of accounts. I created my own bank type account as a petty cash account.
Write a Check to Employee for Cash Advance
Click the Quick Create (+) icon, select Check under the Vendors column
In the Check window, do the following:
Payee's name = Employee's name (choose the vendor option)
Bank Account = Petty Cash account or a Clearing account
Payment Date = Expense report submission date
Ref No = Check number or bank reference number if doing ACH
Division = Location tracking
Category = Employee cash advances account
Description = [Employee name] Cash Advance
Enter an amount
Enter a customer/project if applicable
Enter a class
Copy and paste the above description field text in the memo field
Add any applicable attachment like your advance payment request form
Click Save and Close
PRO TIP: Don't forget to remind your employee to submit an expense report with supporting documentation for how the cash was spent.
Record the Expense to Reduce The Employee Cash Advance Account Balance
For this process, you will need a copy of the expense report from the employee and need to use the petty cash or clearing account we created above.
To record the expense transactions, we are going to do a zero-sum transaction using an expense form instead of a journal entry.
Create a Zero-Sum Expense
Click the Quick Create (+) icon, select Expense, or Check under the Vendors column
Enter the same vendor's name (aka your employee) from the prior step
Payment account = Petty cash account or Clearing account
Payment date = Expense report submission date
Payment method = Cash
Reference no = Employee's abbreviated name and expense report submission date (ex. JD20190602)
Location Label = Select from the dropdown option your location name
Category = expense account for each transaction listed on the employee’s expense report
Description = purpose of the transaction
Enter an amount, customer/project if applicable, and a class
Repeat all of the above for any additional expenses from the expense report
In the final line, do the following:
Category = Employee cash advances account
Description = "Reduce [employee's name] cash advance balance for expense purpose"
Amount = Enter the expense report total as a negative amount
Select a class
Repeat the last line memo and attach the expense report in the attachment field
Verify that you expense form total says $0
Click Save and Close
Run the Employee Cash Advances Report to Verify Your Work
Click on the Accounting tab, then select the Chart of Accounts
Scroll down or use the search bar to find the Employee Cash Advances account, then click run report using the dropdown triangle next to view register
In the below screenshot, you can see the expense and check transactions we entered from above in the report. You will notice that the total balance for the employee is now zero.
PRO TIP: You can customize this report to group by vendor and use the save customization green button to save the report for future use.
Summary
Now you know how to track a non-payroll related employee cash advance in QuickBooks Online using an expense form and how to record an employee’s expense report transactions.
If you don't want to keep having to write checks to your employees for travel expenses, I highly recommend giving your employees a virtual business credit card using Divvy and establishing an IRS accountable plan in place. Check out the best credit cards to use for your business.
Questions about using QuickBooks Online run your nonprofit or small business? Contact Ufuoma - I am happy to help!


